Engine Control Module
Engine Control Module
• Modified anti-theft protection has been implemented since 11.06. Identifying feature: locking bracket instead of a locking plate.
=> [ without Anti-Theft Immobilizer ]
=> [ with Anti-Theft Immobilizer and Locking Plate ]
=> [ with Anti-Theft Immobilizer and Locking Bracket ]
without Anti-Theft Immobilizer
• If the Engine Control Module (ECM) will be replaced, connect the vehicle diagnostic tester and perform the "Replacing Engine Control Module" guided function.
DANGER!
On vehicles with a heavy duty suspension, vehicle must be limited to a maximum speed of 210 km/h with the ECM. At speeds above 210 km/h, damage to input shafts can occur. Perform guided function " Limit Maximum Speed" using the vehicle diagnostic tester.
Removing
- Turn off the ignition.
- Remove the windshield wiper arms.
- Remove the plenum chamber cover
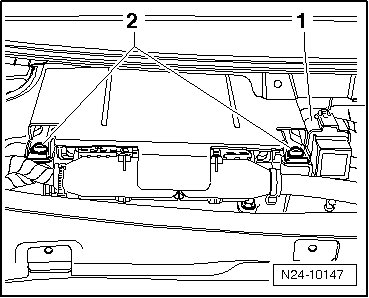
- Disconnect the connector - 1 - from the heated windshield control module (J505).
- Slide the connector latches - 2 - on the ECM outward and remove both connectors.

- Remove the ECM bracket bolts - 3 -.
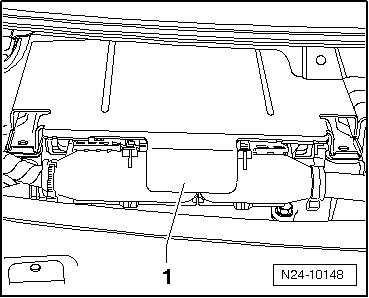
- Remove the ECM bracket with the ECM from the plenum chamber.
- Press the release latches - 1 - outward and slide the ECM - 2 - from the bracket.

Installing
- Slide the ECM - 1 - into the bracket in the - direction of the arrow -.

- Place the bracket with ECM onto the bracket - 4 - in the plenum chamber.
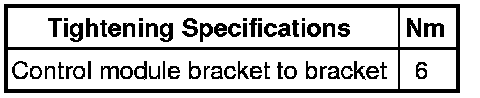
Tightening specification for the plenum chamber bracket nuts: 6 Nm.
- Tighten the ECM bracket to plenum chamber bracket bolts - 3 - to 7 Nm.
- Connect the connector to the ECM and slide the latches - 2 - inward.
- Connect the connector - 1 - to the heated windshield control module.
- Install the plenum chamber cover.
- Install the windshield wiper arms.
with Anti-Theft Immobilizer and Locking Plate
• If the Engine Control Module (ECM) will be replaced, connect the vehicle diagnostic tester and perform the "Replacing Engine Control Module" guided function.
DANGER!
On vehicles with a heavy duty suspension, vehicle must be limited to a maximum speed of 210 km/h with the ECM. At speeds above 210 km/h, damage to input shafts can occur. Perform guided function " Limit Maximum Speed" using the vehicle diagnostic tester.
Special tools, testers and auxiliary items required
• Hot Air Gun from Wiring Harness Repair Kit (VAS 1978)
• Small Nozzle Attachment from Wiring Harness Repair Kit (VAS 1978)
• Locking Pliers
Removing
- Turn off the ignition.
- Remove the windshield wiper arms.
- Remove the plenum chamber cover.
• The threads on the shear bolts are coated with locking compound. By heating the shear bolts using a hot air gun, the inhibition effect of the locking compound is lowered.
CAUTION!
Cover wires, harness connectors and control modules in the close vicinity of the ECM to prevent damage from burning.
Perform the adjustments on the hot air gun - 4 - as shown:
- Turn the potentiometer for temperature adjustment - 2 - to maximum heat output (600 °C (1112 °F)).

- Move the two stage switch for air quantity - 3 - to position 3.
CAUTION!
By heating the shear bolts, parts of the protective housing are heated intensely. Wear protective gloves to prevent injuries.
- Guide the nozzle of the hot air gun onto the shear bolts.
- Turn the heat gun on and warm the bolts.
- Remove the cover shear bolts - 2 - using pliers.
- Disconnect the connector - 1 - from the heated windshield control module (J505).
- Lift the cover - 1 - and pull it forward.
- Slide the connector latches - 1 - on the ECM outward and remove both connectors.

- Remove the ECM bracket from the plenum chamber bracket.
- Press the release latches - 1 - outward and slide the ECM - 2 - from the bracket.
Installing
- Slide the ECM - 1 - into the bracket in the - direction of the arrow -.
- Place the bracket with ECM onto the bracket in the plenum chamber.
Tightening specifications of the plenum chamber bracket nuts: 6 Nm.
- Connect the connectors to the ECM and slide the latches - 1 - inward.
- Slide the cover - 1 - over the ECM and press it downward.
- Tighten the new shear bolts - 2 - uniformly until the bolt heads shear off.
- Connect the connector - 1 - to the heated windshield control module.
- Install the plenum chamber cover.
- Install the windshield wiper arms.
with Anti-Theft Immobilizer and Locking Bracket
• If the Engine Control Module (ECM) will be replaced, connect the vehicle diagnostic tester and perform the "Replacing Engine Control Module" guided function.
DANGER!
On vehicles with a heavy duty suspension, vehicle must be limited to a maximum speed of 210 km/h with the ECM. At speeds above 210 km/h, damage to input shafts can occur. Perform guided function " Limit Maximum Speed" using the vehicle diagnostic tester.
Special tools, testers and auxiliary items required
• Locking Pliers
- If it is desired to replace the ECM, connect the vehicle diagnostic tester and perform the guided function "Replace Engine Control Module (ECM)".
Removing
- Turn the ignition off.
- Remove the windshield wiper arms.
- Remove the plenum chamber cover.
• Covers are installed in some vehicles to protect the ECM from damage. They are secured to the ECM with bolts - 1 -.
- Remove the bolts - 1 -.

- Remove the cover, if present.
- Cover the plenum chamber with a clean cloth so that it does not get scratched.
- Raise the ECM slightly together with the bracket.
- Release the ECM - arrows - and pull it out slightly.
- Bend the raised ends - 1 - of the locking bracket outward.

- Remove the shear bolts - 2 - with locking pliers and remove the locking bracket.
- Slide the connector latches - 1 - on the ECM outward and remove both connectors.
- Remove the ECM.
Installing
- Slide the ECM - 1 - in the - direction of the arrow - into the bracket until it engages.
- Connect the connector to the ECM and slide the latches - 1 - inward.
- Install a new locking bracket and tighten the new shear bolts evenly until the bolt heads shear off.
- Secure the bracket and, if applicable the cover with the bolts - 1 -.
- Install the plenum chamber cover.
- Install the windshield wiper arms.